1.MAKING OF LAND
AIM - Making of land
Soil in different parts
* We can transport land , but we can transport soil .
* In land 45% soil is there 25% of air is there 25% of water and 5% of organic compounds .
* Sand is made by small pieces of rocks
* Highly important elements are N.P.K
PRIMARY ELEMENTS
NITROGEN - GROWTH
PHOSPHORUS- STRENGTH
 POTASSIUM - PHOTOSYNTHESIS
 WHY IS SOIL IMPORTANT?
BLACK SOIL -
Black soil may refer to: Chernozem, fertile black soils found in eastern Europe, Russia, India and the Canadian prairies; Muck (soil), a soil made up primarily of humus from drained swampland; Vertisol, dark cracking soils with a high clay content found between 50° N and 45° S of the equator; Terra preta, “black earth” or soil ...
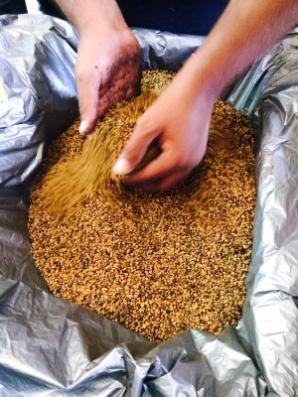
2.SEED PROCESSING
AIM - Seed processing is a crucial step in refining post-harvested seed to its purest form for replanting purposes and human/animal consumption. Seed processing is divided into two main categories: seed cleaning and seed treating.
TOOLS - Bucket ,Paper ,Hand gloves
Method of applications - Seed treatment seed before sowing or seed root or drenching along root zone or 5 to 25 kg ltr water per tree and take care of the seeds while processing
USE - The bio control at the beneficial fungus It is and effective disease for the vegetables and fruits
CAUTION - Store in cool dry and safe place don't expose in sunlight
BENEFITS - Eco friendly , Better germination & growing of plants in 10 kg term protection against infection caused by the
3. IRRIGATION
AIM:- Irrigation
REQUIREMENT - DRIPPER , FOGGER ,SPRINKLER, WATER PIPES , MOTOR
PROCEDURE- 1) Irrigation system like dripper is used for supplying water drop by drop
2) Sprinkling is used for sprinkling water all over crop and fogger is used for supplying water in small amount This type of water supplying system make human life much easier and save lot of time

1) DRIP IRRIGATION - Drip irrigation is a type of micro-irrigation that has the potential to save water and nutrients by allowing water to drip slowly to the roots of plants, either from above the soil surface or buried below the surface. The goal is to place water directly into the root zone and minimize evaporation.
 2) SPRINKLER IRRIGATION -Sprinkler irrigation is a method of applying irrigation water which is similar to natural rainfall. Water is distributed through a system of pipes usually by pumping. It is then sprayed into the air through sprinklers so that it breaks up into small water drops which fall to the ground.
 5) MANUAL IRRIGATION -Manual irrigation systems are very simple, but effective methods for making water available to crops. Manual irrigation systems are easy to handle and there is no need for technical equipment. But it is important that they are constructed correctly to avoid water loss and crop shortfall
4.TOOLS AND ACCESSORIES
REQUIREMENT - To determine all tolls and accessories
There are many field management practices that are done on crops, such as pruning, pest and disease control, watering among others.
The effectiveness and efficiency of these practices require the use of appropriate tools and equipment.
The effectiveness and efficiency of these practices require the use of appropriate tools and equipment.
 1) Curved blade panga - Used for cutting grass, weeding and slashing.
N/B slashing means making a sweeping cut

2) AXE - Axes are usually composed of a head and a handle. The axe is an example of a simple machine, as it is a type of wedge, or dual inclined plane. This reduces the effort needed by the wood chopper. It splits the wood into two parts by the pressure concentration at the blade. The handle of the axe also acts as a lever allowing ...

3) MATTOCK -A mattock /ˈmætək/ is a versatile hand tool, used for digging and chopping, similar to the pickaxe. It has a long handle, and a stout head, which combines an axe blade and an adze (cutter mattock) or a pick and an adze (pick mattock).
4) BLADE JEMBE HOE

4) BLADE JEMBE HOE

Used for cultivating land or weeding crops

garden fork, spading fork, digging fork or graip is a gardening implement, with a handle and several (usually four) short, sturdy tines. It is used for loosening, lifting and turning over soil in gardening and farming. It is used similarly to a spade, but in many circumstances it is more appropriate than a spade: the tines allow the ..


 8) SPRING BALANCE - It consists of spring fixed at one end with a hook to attach an object at the other. It works by Hooke's Law, which states that the force needed to extend a spring is proportional to the distance that spring is extended from its rest position.
N/B:spray means liquid sent in the air in tiny drops

10) HOSE PIPE - Used when moving water in the farm for animals or plants
5. GRAFTING
GRAFTING - Grafting or graftage is a horticultural technique whereby tissues of plants are joined so as to continue their growth together. The upper part of the combined plant is called the scion while the lower part is called the root stock. The success of this joining requires that the vascular tissue grow together and such joining is called inosculation. The technique is most commonly used in asexual propagation of commercially grown plants for the horticultural and agricult
TYPES OF GRAFTING - 1) Saddle graft
2) Bridge graft
3) Inarch graft
4) Bark graft
SADDLE GRAFT - : A plant graft made by fitting a deep cleft in the end of the scion over a wedge in the end of a stock of similar diameter so that the two cambiums are in contact
BRIDGE GRAFT -
a plant graft made by inserting one or more scions with one end below and the other end above an interruption of the cambium or other weak point in the stock and used especially to bridge wounds (as from gnawing) or to reinforce weak or defective grow graft
BARK GRAFT - : A plant graft made by slitting or slipping the bark of the stock and inserting the scion beneath it and used especially in top working and frame working where two or more scions are inserted in the end of each truncated branch of the stock — compare crown graft
PROCESS
 1) Choose your cultivar and your rootstock. In order for your budding to be successful, you must cut a scion (small piece for grafting) from a healthy, disease-free cultivar (origin tree) as well as a suitable growing tree (rootstock). The rootstock in this case is an established tree that the scion can be spliced into. For T-budding, the bark of both trees must be "slipping." This means the bark is easily peeled off and the green layer underneath is moist, which usually occurs in the spring. Try irrigating them well to help them along
 2) Cut a scion. For T-budding, you must cut into the branch 1⁄2 inch (1.3 cm) below the bud to 3⁄4 inch (1.9 cm) beyond the bud. Make the cut as deep as needed to include the soft, green layer beneath the bark but not any deeper. This green material must be exposed on your scion for a successful graft. If you must store your scion bud, wrap it in a damp paper towel, place it in a polyethylene bag, and store it in a refrigerator.[1]
 3) Make a T-cut on your rootstock. Choose a space on a branch or sapling that is 1⁄4inch (0.6 cm) to 1 inch (2.5 cm) in diameter. The space must be free of any buds, ideally far from any buds. Make a vertical slice in the bark about 1 inch (2.5 cm) long and deep enough to expose that green layer. Make a horizontal slice of the same depth that is about one third the distance around the rootstock. Twist the knife in the juncture of the slices to create flaps of the bark, making the green layer visible.
 4) Introduce the scion. Slip the scion containing the bud under the flaps you've just created on the rootstock, taking care not to introduce any dirt or germs. If part of the scion's bark sticks out above the T-cut, slice it off so that everything fits together snugly.
 5) Tie the scion to the rootstock. Wrap a stretchy rubber material such as grafting rubber around the rootstock to hold the scion in place. Be careful not to jostle or cover the bud.
  6) Remove the tie. In about a month, the rubber you wrapped around the rootstock may loosen and fall off. If it doesn't, gently remove it yourself so that the area will not be constricted.
  7) Follow up on your bud. If the bud looks plump and healthy, it is probably alive. If it looks shriveled, then it has died and y
6. Soil Testing

Humas (micro bacteria)
- Used to Compost natural waste.
Why to do this?
- To recognize what is our soils fertility is.
- which Organic we want to use to improve its fertility to get better results
Important elements are N, P, K.
N - Nitrogen (for growth and height )
P - Phosphorus (to give strength & to spread roots )
K - Potassium (to make Photosynthesis )
Nitrogen is compulsory know (govt ordered)

- If our land doesn't contain nitrogen then our crops leaves will be Yellowish.
- If the plant con't gets it minerals then it will be effected by Disease.
When we test the soil we can get an idea about our land.
Sand


For agriculture Water and sand are the important eliments.
- Water will be - 25%
- Sand will be - 45%
- Air will be - 25%
- Organics - 5%
Sand made from small rock pieces.
Highly important particles in sand are N , P , K .

Primary elements
N - Nitrogen (for growth and height )
P - Phosphorus (to give strength & to spread roots )
K - Potassium (to make Photosynthesis )
Secondary elements
Iron
Manganese
Tamba
If these are equal in sand then plant will be healthy.
By using organics we can get better result.
Organics :-

Kitchen waste
Cumpost
Khat
7. JEEVAMRUT
JEEVAMRUT MEANS ONE SOLUTION MANY BENEFITS
Jeevamrut: Organic manure
Jeevamrut is a liquid organic manure popularly used as means of organic farming. It is considered to be an excellent source of 'natural carbon', 'biomass', 'Nitrogen', 'Phosphorous' 'Potassium' and lot of other micro nutrients required for the crops. As compared to other forms of manure, composts, vermi-compost, Jeevamrut can be prepared very quickly and has proven to be lot more effective. Usage of Jeevamrut along with other manures can also prove to be beneficial.
Advantages of Jeevamrut:
• It acts as an agent to increase the microbial count and friendly bacteria in the soil
• As the preparation time is only 4-5 days, it can be used effectively and frequently
• Usage of Jeevamrut helps increase the earthworm count in the soil; earthworm leads to a very porous quality soil which has a higher water holding capacity, improves aeration, bring up minerals from deep in the subsurface that are often in short supply in surface layers
• If used consistently it can eradicate the need for chemical fertilizers completely
• Improves the PH of the soil
• Suitable for all crops and increases the yield and cuts down on entire expenses of Chemical fertilizers.
 Jeevamrut is prepared as follows
1. 1000 Liters of Water
2. 50 KG Indian/Desi Breed Cow Dung (It has been observed that the nutrient values found in Indian breed cows is much higher than the hybrid ones)
3. 50 Liters of Cow Urine (Gomutra)
4. 10-12 KG of Gram Flour (Besan) (Other Pulses flour can also be taken)
5. 10-12 KG of Jaggery (Gudh)
6. Two Handfuls of Soil taken from the roots of Banyan Tree (or any other old tree found close to the farm. This act as source of friendly bacteria and enzymes required for the good health of soil)
The above ingredients should be stored in a cool place and away from sunlight. The mixture needs to be stirred couple of times (10 mins every time) for 4 days. The ingredients ferment and Jeevamrut is prepared for the use. This Jeevamrut can now be used for 2-3 days. Beyond the 8th day of preparation, the bacterial colonies in the liquid start reducing. It is beneficial to do a live mulching (mulching with help of grass, hay, sugarcane straw remains etc.) along with the Jeevamrut application. Mulching will help the earthworms (Gandul / Kenchua) to work in the soil till upper most layer bringing more porosity and minerals till the surface.
Hurdles faced with usage of Jeevamrut:
Jeevamrut is prepared from animal remains and naturally it has a very foul smell. Also, as it is in liquid state it isn't as easy to handle as the regular solid fertilizers. The liquid also, has a shelf life of not more than 10-12 days beyond which it isn't effective to be used.
Due to these factors, Jeevamrut has to reach each crop quickly and consistently. It's drenching has to be at the roots of the plants. Farmers with smaller plots have tried to manually drench Jeevamrut, however labor turns out to be a major challenge. First, finding labor to work in such foul smell (which even animals get repelled from) is difficult and secondly, manual drenching on a consistent basis to an average plot of 5 acres will require 4-5 labor. The wages for the labor will be anywhere between Rs. 15-25,000. This takes out the feasibility out of this method of farming.
Due to these factors, Jeevamrut has to reach each crop quickly and consistently. It's drenching has to be at the roots of the plants. Farmers with smaller plots have tried to manually drench Jeevamrut, however labor turns out to be a major challenge. First, finding labor to work in such foul smell (which even animals get repelled from) is difficult and secondly, manual drenching on a consistent basis to an average plot of 5 acres will require 4-5 labor. The wages for the labor will be anywhere between Rs. 15-25,000. This takes out the feasibility out of this method of farming.
Overcoming the Hurdles:
The above hurdles can be overcome if we automate the Jeevamrut irrigation. The automation can be achieved using the existing drip / sprinkle irrigation on the farm to irrigate the entire crop. For this we will need to filter the Jeevamrut to remove all the suspended particles in it which can cause blockages/choking the nozzles of drip irrigation or sprinkle irrigation. There is a product named "Pruthviraj Jeevamrut Filter[2]" available for filtration of all organic slurry. With help of such product one can use Jeevamrut effectively and get rid of hazardous chemical fertilizers.
The above hurdles can be overcome if we automate the Jeevamrut irrigation. The automation can be achieved using the existing drip / sprinkle irrigation on the farm to irrigate the entire crop. For this we will need to filter the Jeevamrut to remove all the suspended particles in it which can cause blockages/choking the nozzles of drip irrigation or sprinkle irrigation. There is a product named "Pruthviraj Jeevamrut Filter[2]" available for filtration of all organic slurry. With help of such product one can use Jeevamrut effectively and get rid of hazardous chemical fertilizers.
8. AZOLLA
1) Gather azolla, and bring it home in a plastic cover, then put it in a tub that has water in it. It will be fresh for only 2 days. It should not be exposed to sunlight.
2) Make a pit that is 5 feet by 3-3 ½ feet. The floor of the pit should be very even. Remove any roots
3) Spread out the plastic sheet. It should be 2 feet longer and 2 feet wider than the pit, with no holes. The sheet must be spread out smooth. The sheet’s outer edges should be fixed with mud so that they don’t move. Making this mud wall around the pit also helps to keep things out of the pit. Any mud that has fallen in should be removed completely.
4) Now fill the pit with water. The depth of the water should be the same as the height of a brick. The water level must be maintained daily – if it goes down add more water. Even small holes in the sheet will result in water leakage.
5) Add 1 ½ kilograms of cow dung.
6) Bring azolla in jeevamuthra water and add it to the pit. In 15-20 days, the azolla will grow to fill the pit.
7)The pit must be in the shade. If the pit isn’t under a tree, build a shelter for it. If the shelter is damaged, you must repair it.
8) When the azolla has grown to fill the pit, remove some and wash it to get rid of the cow dung smell before feeding to the cow. If the cow will not eat it, wash it again and give it to the cow. Start with feeding the cow 75-100 grams of azolla daily in the morning, then increase up to 1 kg.
From time to time, add jeevamuthra or cow dung water (slurry). Every now and then ½ to 1 kg of cow dung can be added. Do not dry the azolla.
If you remove 100 g of azolla from the pit one day, the next day it will have grown back. Azolla can also be used to fertilize paddy. Azolla absorbs nitrogen from the atmosphere.
9. PROJECT
प्लॉट क्रमांक :- 7
| ||||
पिकाचे नाव / जात :- मेथी/पुसा अर्ली बंचिंग, कसुरी
| ||||
पिकाचा कालावधी :- 45 ते 60 दिवस
| ||||
जमिनीचा प्रकार/सामू :- मुरमाड/PH
| ||||
अ.न
|
दिनांक
|
वेळ
|
करावयाचे काम
|
प्रक्टिकल
|
१
|
8-2-18
|
09:00
|
प्लॉट साफ केले.
| |
२
|
10-2-18
|
11.00
|
शेणखत टाकला
|
खताचा डोस
|
३
|
11-2-18
|
10:00
|
मेथी चे बी फेकले
|
बीज प्रक्रिया
|
11:00
|
पाणी दिले
|
पाणी देण्याच्या पध्दती
| ||
४
|
13-2-18
|
08:00
|
पाणी दिले
|
पाणी देण्याच्या पध्दती
|
५
|
18-2-18
|
4:00
|
गोमुत्र 2 पम्प मारले
|
खताचा डोस
|
६
|
20-2-18
|
10:00
|
पाणी दिले
|
पाणी देण्याच्या पध्दती
|
७
|
23-2-18
|
9:00
|
पाणी दिले
|
पाणी देण्याच्या पध्दती
|
८
|
25-2-18
|
06:00
|
पाणी दिले
|
पाणी देण्याच्या पध्दती
|
९
|
27-2-18
|
12:00
|
पाणी दिले
|
पाणी देण्याच्या पध्दती
|
१०
|
1-3-18
|
2:00
|
युरिया खत टाकला
|
खताचा डोस
|
2:30
|
पाणी दिले
|
पाणी देण्याच्या पध्दती
| ||
११
|
3-3-18
|
11:00
|
पाणी दिले
|
पाणी देण्याच्या पध्दती
|
१३
|
5-3-18
|
09:30
|
मेथी काढली व फूडलॅब ला दिली
|
पिक काढणे
|
मेथी च्या एका पेंडीचे वजन २०० ते १५० gm इतके भरलेएकूण मेठींच्या गड्ड्या – 61 आहेत्याचे वाजग 15 kg इतके झाले.


10. Recognizing the age of cow

Requirement -: gloves, mask, measurement tape.
procedure-:1)Go to the where you can get cow goat or else
2)first observe the length
3)While observing check how many teeth they have .
4)Chek while they milkyteeth or permanent teeth.
5)While checking the animal teeth take care that they will don't bite while checking the teeth.
- Formula : A*A*B/10400
- A - Chest area
- B - Distance from head bone to tail b

Production of cow -:9 Month's
11. TDN(Total digestive nutrient)
Aim :To study total digestive nutrient of animals.
Requirements-: Pen,paper
Procedure-:A x A x B A =Chest area
10,400 B =Distance from harn to monkey bone.
= 60902 10.400
= 585.774 kg.
Calculation according to feed
1)Bhuimug pend =71%
2)Ginger grass =72%
3)Jowar kadba =40%
4)Bajri sarmat =35%
TDN = Cow TDN
Cow reed
= 39.28
9
= 787,699m
Result-: According to TDN determination we can come to know whether cow farming is in profit or loss

1)Take the measurement of stand where we want to fix the drip pipe then cut those to fix.
2)Then make holes where you want to fix fogers.
3)Then fix these where water comes from.
4)Take trays then clean with normal water then with potassium after this dry those.
5)Then take corn an soak in hot water for 24 hours.
6)Then take bag and pour whole corn in 2 or 3 bags, then store for 24 hours.
7)After the time period we can observe sprouting of corn in bags.
8)Know take corn out and fill in trays in required quantity.
9)Set all trays in stand properly.
10)Set timer as 2 minutes a 1:45 hour.
11)Leave it for 7 day it will grow 7 inches, then take out,then wash and feed.


Requirements :-
Kadba ,Kutti,Salt,Water,Gud (Jaggery),Drum-500kg,Weighing machine
Quantity & Costing :-
Total = 103.5 rupee

Labour Charge :- Total amount*25%/100
103.5*25/100 = 27.87 rs
Process :-
12. Hydroponics
Aim :- Making food for annual in summer season.
Requirement : 1)Shade net 2)Trays with holes 3)sack 4)Corn 5)Drip pipes 6) Foggars 7)End caps 8)PVC pipes 9)Stand like structure 10)Sprayer with bottle 11)Timer with tripper
Process :-1)Take the measurement of stand where we want to fix the drip pipe then cut those to fix.
2)Then make holes where you want to fix fogers.
3)Then fix these where water comes from.
4)Take trays then clean with normal water then with potassium after this dry those.
5)Then take corn an soak in hot water for 24 hours.
6)Then take bag and pour whole corn in 2 or 3 bags, then store for 24 hours.
7)After the time period we can observe sprouting of corn in bags.
8)Know take corn out and fill in trays in required quantity.
9)Set all trays in stand properly.
10)Set timer as 2 minutes a 1:45 hour.
11)Leave it for 7 day it will grow 7 inches, then take out,then wash and feed.

Result :- From 1 kg corn we can get minimum 4 kgs of fodder.
Practical : 17
13. Murghas

Requirements :-
Kadba ,Kutti,Salt,Water,Gud (Jaggery),Drum-500kg,Weighing machine
Quantity & Costing :-
- Kutti material = 40kg + 80 rs
- Salt =50g + 7 rs
- Jaggery =100g + 5 rs
- Mineral mix =50g + 10.5 rs
- Butter milk =50ml + 1 rupee
Total = 103.5 rupee
Labour Charge :- Total amount*25%/100
103.5*25/100 = 27.87 rs
Process :-
- We bought kutti material from farm and cutted it in small peaces.
- Then we added jaggery in water.
- We also added salt and urea and in water,then we mixed all that materials.
- Then we sprayed on all the kutti material.
- Then we filled in a bag which has 2 layers of Plastic cover and bag typed.
- In between the time of filling in bag we totally compressed all the materials by pressing.
- Then we packed the bag without air in it.
- As it is high in protein it should be feed to animals.
- It also increases milk production of animals.
- It helps to increase animals weight and milk production.
- Know we made a pickle like item for animal,it tastes good,smells good,good for health of it.
14. Planting Of Trees


Aim :- To prepare many types of small plants and to increase production.
Tools :- Scale(30cm), Plastic bag, Siccors, Knife, etc.
Procedure :-
- Khach kalam :- leaves should be cutted before 8days and then stems should be packed with plastic strips.
- Bhet kalam :- For this, two trees are needed, as we have to cut the base part and join the stem on the cutted part and park with plastic bag.
- Gutti kalam :- A small part of stem is germinated on wild trees by hybriding tem.
Observation :
We can grow plants stronger by this process. As they will be much stronger and also profits in producing fruits and flowers in very less time.
Result :- This may cause bulky production.
15. Making of land for Cropping

Types of soils :
- Chikkad soil (percentage of water is high in this)
Eg. In lakes
In dal-dal
Under water
In storage tanks at bottum
In all these above we can see this soil.
- Red soil (coloured red)
Eg. In nurseries
Used for small plants
In hilly areas
In all these above we can see this soil.
- Black soil (In this soil water doesn't evaporate quickly).
We can recognize by its colour .
Blakish

- Vaalu ( silky soil )
Mostly used in constructions
Coloured brown
- Violet ( Its mountainious soil )
Recognize by its colour.
By separating soil into separate particles.
Seed processing

- Why to do ?
For its quickly growth.
Its different for different seeds.
Types of roots :-
Grouped - Jowar
Corn
Bajri
Wheat
Rice
Nachni
For all these use ajatobacter.

Dvidal - Mutter
Dal
Bhuimura
and
All oil extracting seed
For all these use Raijobium.
Materials required : Water,Ajatobacter or Raijobium,Gul'l
Tools required : Phavda, Bucket, Ghamela, Paper, Glouose
Raijobium, Ajatobacter, Are used for protection.
G.A - Gibraillic Acid
For 1 acr 500ml - 50 to 100 ltrs of water.
Procedure:
- Put it in a container and spread it on paper.
- Then mix water, Gul'l, Ajatobactor or raijobium, in container.
- Then spread it on a paper.
- Then mix these totally.
- Then dry in the shadow.
- Then try to plant it quickly as you can.
16. What is Lactometer
Lactometer, a cylindrical vessel made by blowing a glass tube. One side of glass tube looks like a bulb with filled by mercury and another site is thin tube with scaled. For milk testing lactometer dipped in milk which we are testing. In lactometer the point up to which it sinks in the pure milk is marked after that put in water and marked at the point up to which it sinks in water. It sinks less in milk then water because as we know milk is denser then water. At lactometer there are to portions i.e. ‘M ‘and ‘W’ which is divided in three parts and marked as 3, 2 and 1. That indicates the level of the purity in Milk.
Here below some steps mentioned for milk testing –
Step 1- Whenever you want to test the milk purity , you just put the instrument or lactometer in milk.
, you just put the instrument or lactometer in milk.
Step 2- If it sinks up to the mark ‘M’ which mentioned at lactometer that means milk is pure or if not that means milk is impure.
Step 3- If the milk is mixed in water then it would sink higher then marked ‘M’.
Step4- If it stands at the mark 3 that means milk is 75% pure and respectively 2 for 50% purity and 1 means 25% purity.
Lactometer is basically more suitable or useful in sea warfare where now the days most of shops and submarines also use it for milk purity test. Here below advantages of lactometer mentioned by which you have an idea about how a lactometer gives you advantage-
Advantages of Lactometer
Everyone can use lactometers easily.
Lactometers results have maximum accuracy.
Lactometer requires low maintenance cost.
Lactometers price are minimum that’s why anyone can purchase it.
Lactometers are used for milk purity checker and also a very reliable instrument. It is scientifically observed that the cases of skimmed milk the lactometer fails to provide correct results if the density of skimmed milk is made equal to pure milk adding water.
Conclusion- Lactometer is useful for milk testing by which anyone can measure their milk purity easily. It’s necessary to eat or drink healthy for a healthy life.
17. Fertilizer Dose
A soil test would be the optimum way to determine what type of fertilizer, if any, that you need. Also be aware that fertilizer applications may affect soil pH. Soil tests are not exclusively used to determine nitrogen amounts due to the many climatic, chemical and biological factors that affect the amount of nitrogen in the soil at any given time. Nitrogen results are thus based on research results from field experiments to determine the optimum application rate for turf or lawn grass.
Calculate Actual Fertilizer Application For 1 Complete Year
Calculate Amount Of Fertilizer
 The best way and easiest way to distribute fertilizer is with a hand held spreader for small areas and a lawn drop spreader for larger areas. This evenly distributes the coverage needed. Avoid applying fertilizers by hand.

2. Foot / 3.3 = Meter
Are of rectangle = l x b
17. Fertilizer Dose
A soil test would be the optimum way to determine what type of fertilizer, if any, that you need. Also be aware that fertilizer applications may affect soil pH. Soil tests are not exclusively used to determine nitrogen amounts due to the many climatic, chemical and biological factors that affect the amount of nitrogen in the soil at any given time. Nitrogen results are thus based on research results from field experiments to determine the optimum application rate for turf or lawn grass.
The high nitrogen level in a fertilizer gives lawn grass fast shoot development and makes for a deeper green color. The phosphorus provides nutrition for good root development, and the potassium helps the roots build an immune system against diseases. The amounts of each ingredient will be different for various products, but the ratios needed by your lawn grass will remain basically the same over time. To use a fertilizer ratio calculations worksheet, please see this PDF document.
Make sure the lawn fertilizer you apply has complete nutrients in the bag and not just Nitrogen, Phosphate and Potash (N-P-K). Plants often need micronutrients such as iron, manganese, zinc and boron to meet essential growth requirements. A soil test can help make determine what elements need to be applied. Often iron is in critical shortage for alkaline soils and is a needed element for many warm season grasses. Seedland sells Pennington Lawn Fertilizer that includes other trace elements that may be needed for your lawn such as iron.
Many established lawns are fertilized with a weed & feed to control weeds and feed your lawn grass at the same time. Over time as your weed problem is reduced, you can usually switch to a fertilizer without the chemical control of a weed & feed. It is important that you read the directions on the container of weed and feed products and clearly determine that the product is suitable for your grass species. Never apply a weed and feed product to a new lawn, instead use a product such as Pennington Lawn & Grass Plug Starter sold online by Seedland.
New Lawn Starter Fertilizer
New lawn starter fertilizer should be your choice when planting seed or grass plugs in a new lawn. With an analysis of 18-24-6 you will get the phosphorous needed to establish a good root system and potassium to protect this new root system. The nitrogen contained in this fertilizer will assist with grass leaf or shoot development while ensuring a nice green color. This fertilizer also contains these additional elements - Boron, Iron, Zinc, Copper, and Manganese.
Calculating Fertilizer Ratios*
If your soil test report recommends applying 1.5 lb of nitrogen, 0.5 lb of phosphate, and 0.5 lb of potash per 1000 sq ft, you should apply a fertilizer with a ratio of 3-1-1 since you need three times as much nitrogen as phosphate and three times as much nitrogen as potash. The simplest method of determining a ratio is to divide the weights of nitrogen, phosphate, and potash by the lowest weight of the three.
You can also determine fertilizer ratios from fertilizer numbers by dividing the percentage of nitrogen, phosphate, and potash by the lowest percentage of the three nutrients.
*Courtesy of Penn State AG Sciences Department
Yearly Fertilizer Rates For Grass Lawns
See the chart below to determine how much fertilizer to use on your particular lawn grass species per year. Please note that if you have planted a lawn grass mixture (multiple grass types) year long fertilization rates must be applied by establishing which grass species is the dominant grass and fertilize according to the needs of that grass.
Most all charts will give the rates in pounds of nitrogen per 1000 square feet for the growing season (year). We recommend a soil test to determine the additional, if any, nutrient needs of your lawn grass.
Lawn Grass Fertilization Rate Chart By Species
| GRASS FERTILIZATION RATES: Lbs / 1000 sq. ft. of N per year. | LOW | HIGH |
| BAHIA GRASS - Pensacola & Argentine | 2 | 5 |
| BENT GRASS | 3 | 6 |
| BERMUDA - Hybrids & Common | 2 | 5 |
| BLUEGRASS | 2 | 4 |
| BUFFALO | 1 | 2 |
| CARPETGRASS | 2 | 3 |
| CENTIPEDE | 1 | 3 |
| FESCUE - Tall | 2 | 3 |
| FESCUE - Fine - Creeping - Chewings | 1 | 2 |
| RYE ANNUAL & PERENNIAL | 2 | 3 |
| ST. AUGUSTINE | 3 | 6 |
| ZOYSIA | 2 | 4 |
Calculating Fertilizer Rates For Lawn Grass
From the chart above of "lbs. per 1000 sq. ft" of Nitrogen you can calculate the amount of fertilizer you actually need during a year. For example, if you have bluegrass under average maintenance you would need 3 lbs. of N yearly according to the above chart.
Calculate Actual Fertilizer Application For 1 Complete Year
Total Fertilizer For Multiple Applications
The first number in a fertilizer analysis is the nitrogen percentage. A bag of 25-4-6 fertilizer has 25% Nitrogen per bag. Divide this N amount into the lbs. per 1000 rate from the chart above. In this case divide 3 by .25 = 12 (use decimal conversion on the percentage i.e.: 25% = .25 )
This means that 1000 sq. ft. of your lawn would require 12 lbs. of this analysis of fertilizer in a YEARS time. This rate would provide a mid-range of maintenance (average) on a Bluegrass lawn. Thus under a mid-range maintenance plan, you would fertilize twice a year. Therefore you need to apply 6 lbs. of actual fertilizer per application twice a year per 1000 sq. ft. of your lawn --- A 18 lb. bag of lawn fertilizer, such as the one we sell, covers 5000 sq. ft.
Calculate Amount Of Fertilizer
Per Application - For Each 1,000 Sq. Ft.
Divide your fertilizer nitrogen analysis ( the first number) into 100. If the analysis is 27% Nitrogen. 100 divided by 27 = 3.71. That means you would need to apply 3.71 lbs. per 1000 sq. ft. to apply an actual rate of 1 LB of Nitrogen per application.
High Input Grasses
Grasses being highly maintained such as for golf courses and athletic fields will need more fertilization according to the intensive upkeep that is required to promote the fastest and thickest growth possible. Hybrid varieties such as these are the most care intensive of the grasses used for turf purposes. Fertilization programs based on weekly, bi-weekly or monthly applications are often required to maintain the grasses at optimum growth.
Make sure the lawn fertilizer you apply has complete nutrients in the bag and not just Nitrogen, Phosphate and Potash (N-P-K). Plants often need micronutrients such as iron, manganese, zinc and boron to meet essential growth requirements. A soil test can help make determine what elements need to be applied. Often iron is in critical shortage for alkaline soils and is a needed element for many warm season grasses.
Applying or Spreading Fertilizer
The best way and easiest way to distribute fertilizer is with a hand held spreader for small areas and a lawn drop spreader for larger areas. This evenly distributes the coverage needed. Avoid applying fertilizers by hand.
Many larger lawns are fertilized with a push broadcast spreader such as the one pictured at right. You should calibrate your spreader using the manufactures instructions included in new spreaders
18.Measurement


Aim : To know about Types of land measurements.
Required : Big measuring tape,Plot,Notes,etc.
Procedure:
Required : Big measuring tape,Plot,Notes,etc.
Procedure:
- Take a tape and measure the one side of plot, and note it.
- Do same on other side.
29 x 25f - Plot
1. Meter x 3.3 = Foot
- 8.78 x 3.3 = 29f
- 7.57 x 3.3 = 25f
- 29f x 25f = 1015sqf
2. Foot / 3.3 = Meter
- 29 / 3.3 = 8.78
- 25 / 3.3 = 7.57
- 8.78 x 7.57 = 66.237sqm
3. Foot x 12 = Inch
- 29 x 12 = 348 inch
- 25 x 12 = 300 inch
- 348 x 300 = 104400sqm
4. Inch x 2.5 = Centi meter(cm)
- 348 x 2.5 = 870 cm
- 300 x 2.5 = 750 cm
- 870 x 750 = 652500sqcm
5. Centi meter(cm) x 10 = milli meter (mm)
- 870 x 10 = 8700sqmm
- 750 x 10 = 7500sqmm
- 8700 x 7500 = 65250000sqmm
= 29 x 25 sqf
= 1015sqf.
Gunta = 1089 - 1015 = 74 f less than one gunta.
Info :
- 1 m = 3.3 f
- 1 f = 12 inch
- 1 inch = 2.5 cm
- 1 cm = 10 mm
Info :
- 1 gunta = 33f x 33f = 1089sqf
- 40 gunta = 1 acr
- 1 hector = 2.5 acr
- 1 hector = 100 gunta
My plot :
meter = 66.2375sqm
foot = 115 sqf
Inch = 104400 sqinch
cm = 652500 sqcm
mm = 65250000 sqm
Conclusion : We Identified all types of land measurements of our plot in different types.
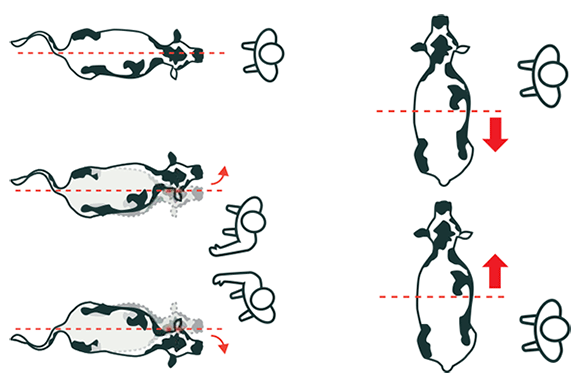
19. Weight recognizing of cow


19. Weight recognizing of cow

Aim : Recognizing age of cow using its body measurements.
Requirements :
- Measuring tape
- Paper
- Pen

- Measure the chest area of cow (round)
- Measure from head bone to tail bone.
- Note down measurements, and calculate using formula.
- Formula : A*A*B/10400
- A - Chest area
- B - Distance from head bone to tail bone